Shadowrocket Setup Guide
Once you have connection details, follow the steps in order: import, choose a mode, connect, and verify. Get one connection working before adjusting rules or On Demand.
Before You Begin: Have the App and Connection Details ReadyThis guide is for iPhone and iPad users who have installed Shadowrocket from the App Store and already have their own subscription link or server details. This site does not provide, sell, or recommend servers or subscriptions. Get your connection details from your own provider.
The app is a one-time purchase; a server plan is separate. Buying the app does not automatically provide a usable server. Check the App Store page for system requirements. If you haven’t completed the purchase or verified the genuine app, see How to Get the App.
The images below are official App Store screenshots for identifying the interface. Options and layouts may differ; refer to the current app. Do not use example details shown in the screenshots as your own connection information.
Add a Server or Import a Subscription
Identify the type of information you have before choosing an import option. A subscription link, an individual server share, and a Config file are different things.
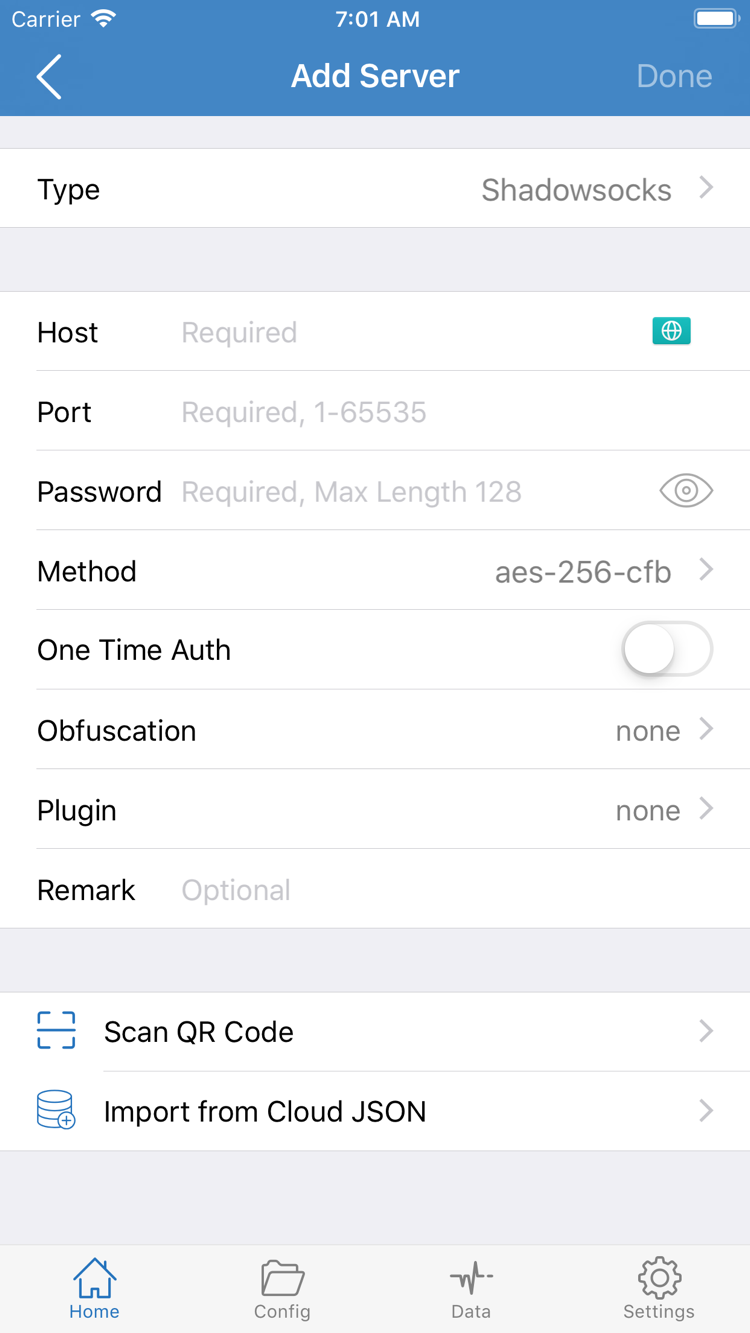
After opening Shadowrocket, go to Home. The SERVER section shows your server entries. The first step is to add details using Add Server, not to turn on the connection switch at the top. Before importing, identify what you have: a subscription link that can update a server list, share details for one server, or a Config file containing rules. Choosing the wrong option can prevent the information from being parsed, even when it looks like a link.
Have a Subscription Link? Use Subscribe
Copy the complete subscription link from your own provider. Open Add Server, choose the subscription type corresponding to Subscribe under Type, enter the URL and a recognizable name as prompted, then save. Subscription management options may appear in different places depending on the interface; follow what you see in the current app. Preserve the original parameters when copying. Don’t add quotes, spaces, or line breaks, and don’t mistake an account-management webpage URL for a subscription link.
Wait for the subscription contents to load, then return to Home and check whether the imported servers appear under SERVER. If you see the subscription name but no selectable entries, check whether the update succeeded. Don’t repeatedly add the same link. Updating a subscription changes its entries; it doesn’t guarantee that every server can connect. Next, select a valid entry and test it.
Have Details for One Server? Fill In the Fields by Type
In Add Server, choose the Type that matches your details, then enter Host and Port. Authentication fields and transport options vary by protocol. Password and Method shown in a screenshot are fields for that particular type, not universal fields required by every protocol. Don’t substitute a protocol just because its name looks similar, or change the encryption, TLS, or transport settings provided by your provider without a reason.
If you have a QR code, check its source before using Scan QR Code. Follow the system prompt if camera access is required. Import from Cloud JSON is for a specific format; don’t enter an ordinary subscription link there. Whichever method you use, open the saved entry and check its fields, especially the port, authentication details, and protocol type.
After Saving: What to Check
Return to Home, select the server you plan to use, and confirm it appears as the current selection. A name helps identify an entry; it doesn’t prove connection quality. For the first test, stick to one clear target so you can tell which server you tested. Subscription links often contain account credentials, so don’t share the full link or its QR code publicly. See the glossary for terminology.
Done when: SERVER contains a selectable entry, and the selected server matches the details you intend to test. Next, choose how requests should be handled.
Choose a Global Routing Mode
The server determines where the connection goes; the mode and rules determine which route each request takes.
After importing, tap Global Routing on Home and check the current mode. This guide refers to the three options as Config, Proxy, and Direct, matching the English labels in the app. These are not connection-strength or speed settings. Switching modes won’t fix an incorrect password, an expired subscription, or an unreachable server.
Config: Follow the Active Rules
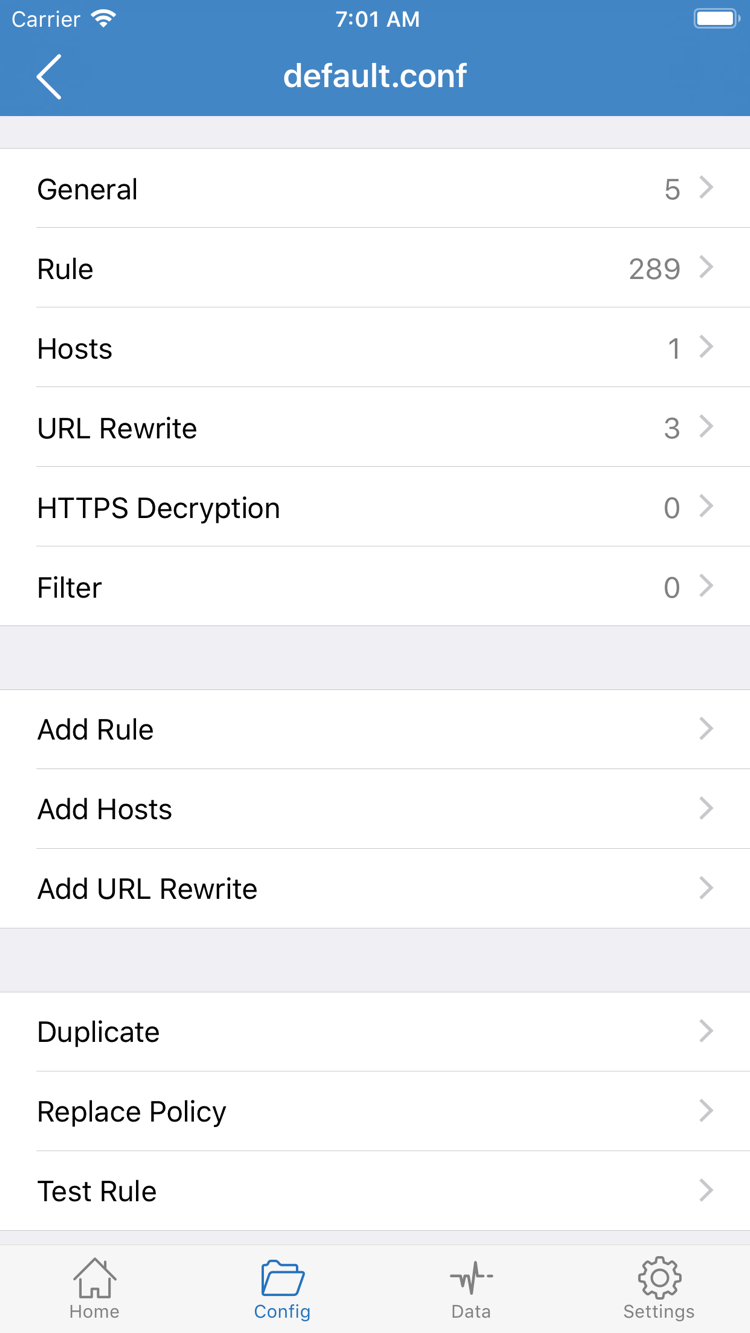
If you have a trusted rules file suited to your needs, choose Config, then open Config to check which configuration is active. Seeing a file in the list doesn’t mean it’s selected as the current configuration; confirm the app marks it as active or in use. A server subscription provides connection entries, while a Config file can contain rules and related settings. Check them separately.
The official screenshot shows the contents of a Config file, including General, Rule, Hosts, URL Rewrite, and HTTPS Decryption. You don’t need to edit these sections one by one to connect for the first time, or enable HTTPS Decryption or install a certificate for a basic connection test. Keep a known configuration in place and start by reviewing Rule entries relevant to your target request.
Rules are typically matched in order, and the matching rule determines the policy. For example, DOMAIN-SUFFIX,example.com,PROXY applies the PROXY policy to requests matching that domain suffix. This is a syntax example, not a usable server or a complete configuration to add to an existing file. Before using Add Rule, check the target, rule order, and policy reference. See rule keyword definitions for an explanation.
Proxy: Compare the Proxy Route
If you’ve selected a server but aren’t sure whether rules are affecting the result, switch to Proxy briefly for comparison. In this mode, requests use the proxy route; that doesn’t mean every type of network traffic will get the same result. If the same target works in Proxy but fails in Config, check the matching rule, policy selection, and related configuration before removing the server.
Direct: Check the Direct-Access Route
Direct handles requests using a direct connection; it doesn’t test whether a proxy server is working. After using Direct to check basic network access, restore the mode you actually need. If you don’t have a suitable rules file yet, use Proxy to test an existing server and organize Config separately. Choosing Config doesn’t automatically provide rules suited to every situation.
Done when: You can identify the selected mode. If you’re using Config, you can also confirm which configuration file is active. Keep this selection and move on to connecting.
Connect and Approve System Access
Allowing the VPN configuration for the first time authorizes the system to handle the relevant network traffic. This is separate from importing a subscription.
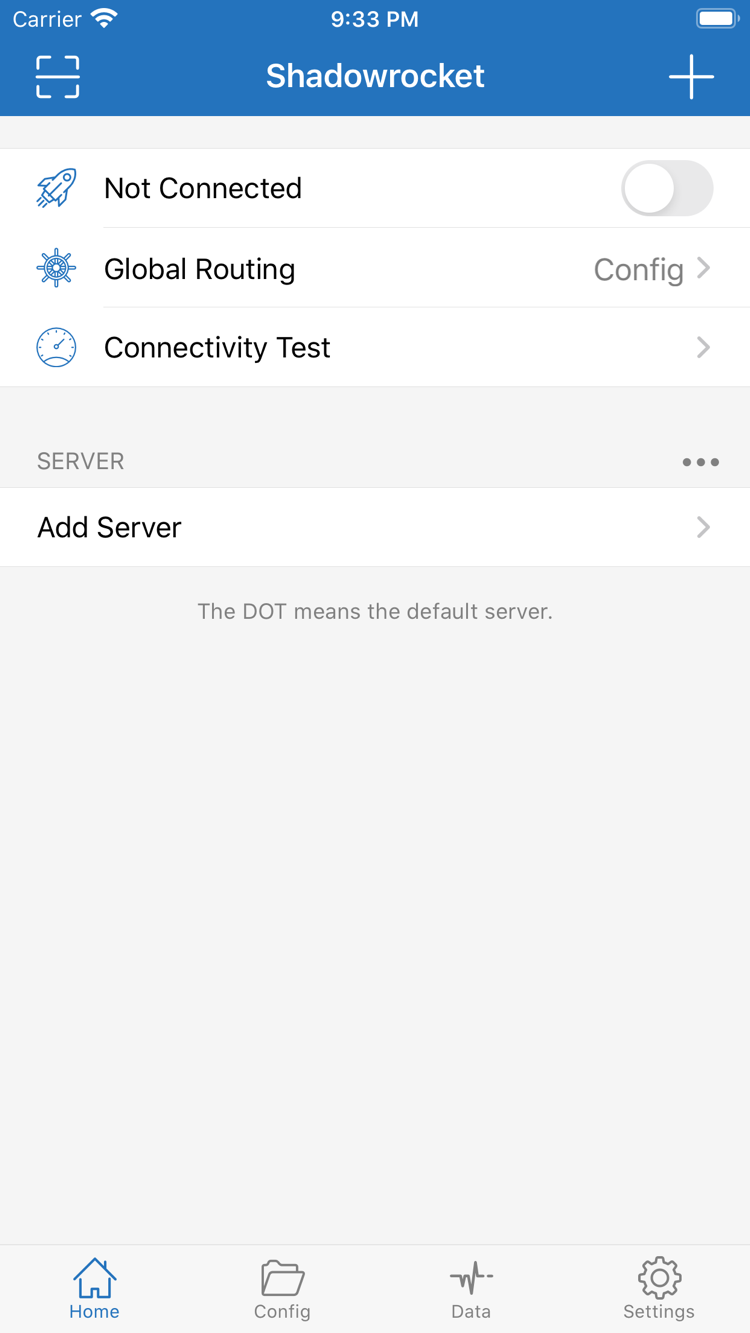
Return to Home and check again that the intended server is selected under SERVER and that Global Routing matches your choice in the previous section. Not Connected in the screenshot indicates a disconnected state; use the switch at the top to start or stop the connection. An entry being present, selected, and connected are three different states. Seeing a server in the list alone doesn’t mean setup is complete.
Turn on the switch at the top. The first time you connect, the system may ask permission to add a VPN configuration for Shadowrocket. Make sure you’re using the app installed on this device from the App Store, then follow the prompt and complete any required device verification. This grants permission for a system network configuration; it doesn’t verify your server details or provide connection information.
After approval, return to Home and check whether the switch stays on and the connection status changes. If you canceled the authorization prompt, turn on the connection switch again and follow the system instructions. To check system records, look for VPN-related items in system settings. The menu name and location may vary by system version; a path that differs from a screenshot doesn’t necessarily mean the configuration is missing.
An On Switch Doesn’t Guarantee Access to Your Target
The VPN status in the system or on Home first indicates that the device’s network configuration is enabled. You still need to check whether the remote server can authenticate, the target service is reachable, and the rules behave as expected. If the switch immediately turns off, note whether you saw an authorization prompt or error. Don’t rapidly toggle it or create multiple system configurations without understanding the cause.
Keep Wi-Fi or cellular data unchanged during testing. Avoid changing the server, network, and mode at the same time. If another VPN configuration on the device can take over network traffic, check whether it’s enabled and what it’s used for before testing; otherwise, interactions between configurations may look like a server issue. For managed devices or organizational networks, follow the applicable management requirements and don’t remove existing configurations without authorization.
Done when: You’ve followed the system prompts and the connection switch on Home stays on. Don’t change any fields yet; test a real request first. When you’re done testing, return to Home and turn off the connection.
Verify the Connection and Real Requests
Check the device status, test result, and target action separately. Don’t rely on a single result as a complete assessment.
With the connection on, run Connectivity Test from Home and see whether the current test completes. Results depend on the test method, target, current network, and server status, so record the result before drawing conclusions. A successful test means there was a response under those test conditions; it doesn’t confirm that every website, app, or protocol has been tested. A failed test doesn’t prove that all real-world access will fail.
Next, open a browser and refresh a familiar page you actually need to use. To test a particular app, make a new request in that app instead of relying on previously cached content. Keep the server, network, and Global Routing unchanged so the results are comparable. An already-open page, offline content, or an image left on screen in the background doesn’t prove the connection is working.
Check Three Layers of Evidence
- Device: The Home switch stays on, and there are no pending system authorization prompts. This confirms the connection control is enabled.
- Test: Connectivity Test completes the selected test. Note the method used; don’t compare results from different methods directly.
- Request: A new action succeeds in the target page or app. If you’re using Config, also check that the rule and policy for the request match your expectations.
If you want to check whether a request went through the proxy, a page loading isn’t enough: it may have used DIRECT. Check the matching Config rule and any relevant records available in the app to understand the route. Some requests succeeding through a direct connection is normal with split routing; you don’t need to change rules just to make every request appear to use the proxy. Logs and records only explain the requests they cover; they can’t replace testing every scenario.
To compare modes, keep the same server and target, temporarily switch Global Routing from Config to Proxy, and make a new request. If the result changes, check the configuration first. If both modes fail, check the server fields, network reachability, and authentication. Change one thing at a time; otherwise, refreshing a subscription, changing DNS, and rewriting rules all at once can make the cause hard to identify.
Done when: The target action succeeds and its route matches your needs. After testing, restore the Global Routing mode you plan to use. If the issue remains, note which layer failed and move on to the final step.
Check Settings and Common Issues
Troubleshoot by symptom and change only one condition at a time. Don’t try to fix an unknown issue by reinstalling or deleting multiple configurations.
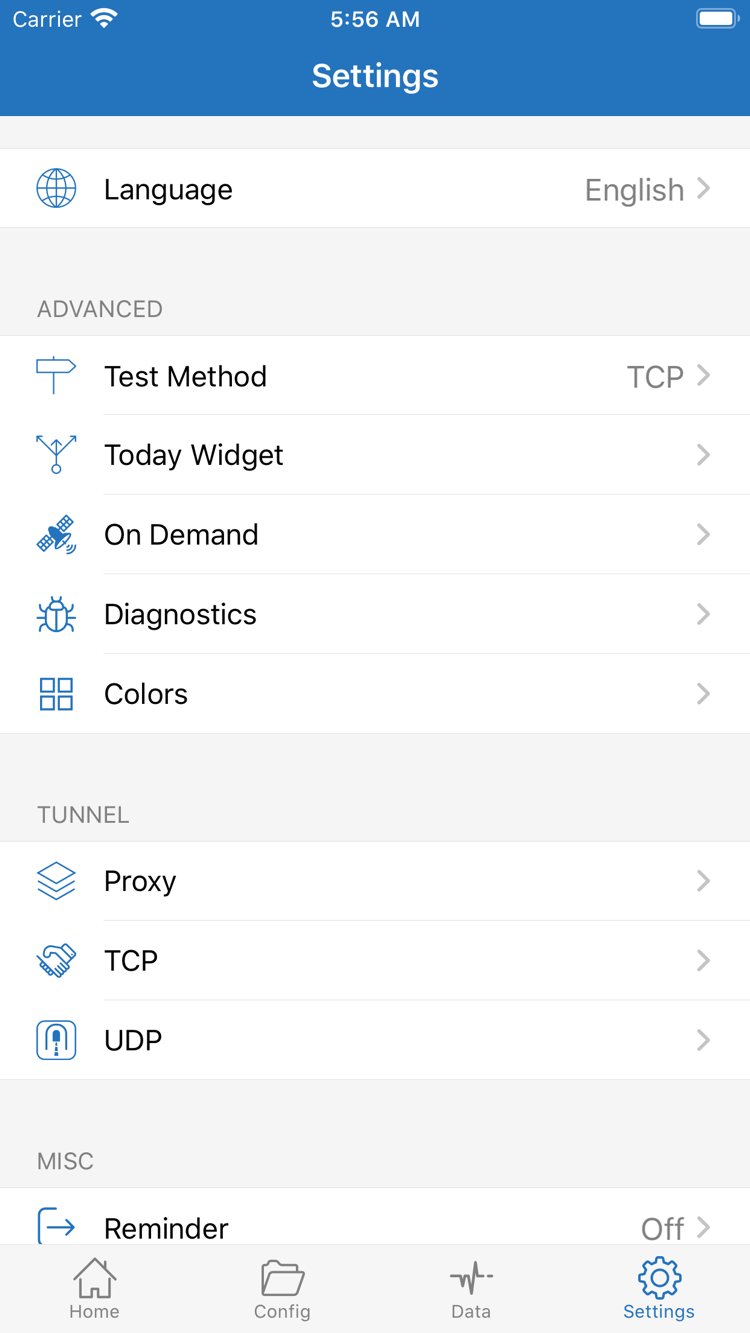
Open Settings and identify the options directly related to your issue. The official screenshot includes Test Method, On Demand, Diagnostics, and settings such as Proxy, TCP, and UDP. You don’t need to change each of these for a first-time setup. Test methods, automatic connection behavior, and protocol parameters address different issues; don’t treat them as universal fixes.
Subscription Saved, but No Servers Appear
Return to the subscription entry and check whether it loaded or updated successfully. Then confirm the link is complete, still valid, and contains data Shadowrocket can parse. Some web addresses open a login page rather than subscription data, so they can’t be used as subscription links. Access to the link on your current network can also affect updates. If it has expired, ask your own provider to confirm the original details. Don’t keep importing the same invalid link.
Server Listed, but Connection or Access Fails
Open the server entry and check Type, Host, Port, authentication, and protocol settings in order. Look for extra spaces or missing fields introduced when copying. Then confirm that this is the selected server on Home. If the switch won’t stay on, check system authorization first. If it stays on but real requests fail, check Global Routing, Config, and server reachability. “Listed,” “authorized,” and “reachable remotely” are separate checks.
Connectivity Test and Real-World Results Differ
Check Test Method in Settings to understand which test is running, then compare the result with an actual action in a browser or target app. Servers may respond differently to different test methods. Use test values to compare under those conditions; don’t treat them as a promise of real-world speed. If only a particular target fails, keep other conditions unchanged and check its rules, resolution, and service status. For detailed steps, see the troubleshooting manual.
Reconnects After You Turn It Off? Check On Demand
On Demand affects when a connection is triggered automatically. Before verifying a basic connection, use the manual switch to establish a clear testing baseline. Once the connection is stable, configure On Demand for your own usage. If the connection turns back on after you turn it off, check whether relevant conditions are set before assuming the switch is faulty. On Demand can’t fix server authentication or restore an expired subscription.
Before Running Diagnostics, Gather the Essentials
Before using Diagnostics or reviewing related records, note where the issue occurs, the current mode and network type, and what changed after adjusting one condition. Before sharing records, remove the full subscription link, authentication fields, QR codes, and account-identifying information. Check screenshot edges and expanded sections for credentials too. More involved diagnostics may cover DNS, rule order, TCP / UDP, or iPad-specific scenarios. This guide doesn’t cover bulk changes; follow the symptom-based sections in the troubleshooting manual.
End of this session: If you can import connection details, select a server, connect, and complete a real request, you’ve established a basic workflow. Before changing rules, learn the terms Config, PROXY, DIRECT, and FINAL in the glossary. Keep a verified configuration so you can compare changes or restore it.
First-Time Setup Checklist
Confirm all five items before adding automatic connection conditions or complex rules.
- Your existing details have been imported correctly, and Home shows the server you intend to use as selected.
- You know whether Global Routing is set to Config, Proxy, or Direct. If using Config, you’ve confirmed which configuration file is active.
- You’ve completed the first VPN configuration authorization, and the connection switch stays in the expected state.
- You’ve run Connectivity Test and made a new real request in the target page or app.
- You’ve restored the mode you need for everyday use. If On Demand is enabled, you understand how its trigger conditions relate to the manual switch.
For future use, you usually only need to check the current server, mode, and connection status; there’s no need to import everything again. If an issue appears after updating a subscription or changing networks, recheck the affected step. For a longer troubleshooting process, see the Shadowrocket troubleshooting manual.